This is a great way to get your tunes heard! There is no downloading. The selection just plays right off the web. The user does not have to search around the site and figure out which player to use.
First, of course you would upload your sound file (like .mp3 file) to your website. The use the web address for that sound file in your code like the example above.
If you enter 2px for the width and simultaneously 0px for the height, the player will be invisible. One thing to note about this is that the visitor will not be able to stop the music, if they want to, without leaving your site.
If you want your own music to auto-play from your website, here is an example code you can insert.
<embed src="your sound file web address here" autostart="true" loop="true" style="width: 165px; height: 86px">
Very cool. I have just released my new guitar piece. "It's Raining on the Moon!" Brace yourself! I have it set on auto play so all you have to do is click on this link to hear the music.....
http://www.kevinbennett.us
In the upper left hand corner, on my site, there will be a built-in player box so you can pause the jams or skip to different points in the piece.
I'm hooked on this instant-jam technology and want use this on more of my websites. If you click on the links within my site, you may find even more sonic surprises!
Thanks for rocking along!
Awesome Guitar

Wednesday, July 13, 2011
Thursday, April 21, 2011
Guitar Intonation
Balancing the intonation across the entire guitar is critical to getting a professional sound. Your open chords might sound fine and nicely in tune, but when you go to solo on the high notes you find something is not sounding right. This is because the actual string length needs to be adjusted.
Especially on new guitars you should always check the intonation since it's not always right straight from the factory. In order to do a test, first tune your open strings as precisely as you can with a digital tuner. Next, play each string at the 12th fret being careful not to bend the string or put undo pressure on it.
Check each string on the tuner as you play the 12th fret (octave). If the note is perfectly in tune when fretted at the 12th fret, you are done for that string. If the note at the 12th fret is sharp you have to move the saddle down or away from the pickups, and vice versa.
On a typical electric guitar with a "floating" tremolo system, you have a screw that holds the saddle to the bridge. First you want to gently release the tension on the saddle until it's moveable. With your other hand, push the saddle forward or back depending on whether the note is sharp or flat. I use a hex key for pushing gently on the saddle. Just use your finger if you don't want to scratch it.
The only way to find correct position for the saddle is trial and error. Tighten the saddle back up in the new position and check The open string and the fretted octave again. If they match perfectly you are done with that string. If not, you have to keep fine tuning each string until they are perfectly in tune.
Another thing to note is once you adjust the string length on one string, that will slightly alter the other strings on a floating tremolo bar. So double or triple check every string again just in case they went off.
Check again every six months to a year to see if the string length needs adjusting. Besides this, normal tuning is just fine to keep your guitar soulding great.
.
Saturday, April 16, 2011
Cubase 6 Review
Hello readers, In keeping with the theory that every guitarist wants to sound great, it's important that we obtain the right tools for the job. What you need is to break away from being dependent on the local recording studios and be able to make real professional quality recordings in your own home.
What I recommend is a recording platform that allows midi and audio to be seamlessly integrated with complete control over the sound environment. In this case, Cubase 6 is my software of choice.
The software is very easy to install, however, they do require a USB device be plugged in at all times for authenticity. I recommend have a dedicated computer just for your studio so you will easily have a free USB port.
The "device setup" is where you will go in and select the correct sound card or sound device for both audio and midi recording. Also critical is the VST connections area where you assign the sends.
I can't emphasize enough the importance of using midi instruments to support your creative musical environment. I use a lot of midi drums but even for live drums it is great to be synced exactly to a click track. In my opinion playing a song just a few bpm's to fast or slow can absolutely ruin the feel.
Stay tuned to hear about how I integrate the midi instruments with the richest high quality samples that sound as good as the real thing and of course, get the ultimate guitar sound!
.
Thursday, April 7, 2011
Recording Tips
Just wanted to break from the music theory aspect and talk about tips for recording your own music at home. Besides playing live, one of the greatest sources of enjoyment for any musician is the ability to capture your greatest moments to preserve for all time.
With today's technology, there are so many great tools at incredibly affordable prices. For only a few hundred dollars, you can essentially have tens of thousands of dollars worth of instruments at your fingertips. The average person can capture a pro-sound that rivals Warner Bros. from the comfort of their own living room.
There are mainly four essential parts to your ideal home studio: Computer, Sound Card, Recording Software and Sound Software (Samples other wise known as Plug-Ins). Take your time and do the research on which is right for you. Hopefully this advice will give you a good head start.
1) Computer - You really want to go ahead and plan on spending around $1000 U.S. for a really fast computer with all the latest features.
2) Sound Card - Go ahead and get the highest sampling rate you can find. The Sound card will make the biggest difference in your sound of anything else.
3) Recording Software - There are many great packages to choose from like Cubase, and Pro Tools. Check out the features to see which is better for your situation.
4) Sound Software - I recommend getting a package with as many sounds as possible like the Komplete series. For a few hundred bucks, you get thousands of dollars of free instruments through virtual samples.
.
Wednesday, March 9, 2011
Blues Guitar Lessons
Studying Blues Guitar is one of the best ways to learn to play expressively. The guitar is a fantastic instrument for playing soulful lines with heavy vibrato which are perfect for this style. One of the best lessons is to look at B.B. King; he can play just one note in some cases, and put so much feeling on it that it's worth a thousand notes. Stevie Ray Vaughn is probably the best technical player in this genre.
The secret key to the blues that alot of people don't realize is that you are playing in a free space between major and minor key centers. To really get the essence of this, try having a friend play a nice straight major bar chord on their instrument along with a beat (or just record yourself if you are alone). Now you normally expect to play along in a major tonality right? Let's say the other person is playing a C Major chord. What I want you to do is hit a really big strong C Minor chord right on top of that major chord.
The notes Eb and E in the two chords are conflicting with eachother so it may sound unatural at first. Keep playing that minor chord on top of the major and your ear will adjust especially after you do this...
- Stay tune for the rest this part!!!
Below is a graphic of the primary "box" pattern for the blues. You can do a million riffs within this simple pattern. You basically start from the root note on the sixth string and the pattern from low to high in frets is 4-3-3-3-4-4
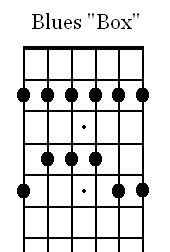
This example is in the key of F#. You will notice that this is actually a natural minor scale which you can play over a major or minor chord.
The secret key to the blues that alot of people don't realize is that you are playing in a free space between major and minor key centers. To really get the essence of this, try having a friend play a nice straight major bar chord on their instrument along with a beat (or just record yourself if you are alone). Now you normally expect to play along in a major tonality right? Let's say the other person is playing a C Major chord. What I want you to do is hit a really big strong C Minor chord right on top of that major chord.
The notes Eb and E in the two chords are conflicting with eachother so it may sound unatural at first. Keep playing that minor chord on top of the major and your ear will adjust especially after you do this...
- Stay tune for the rest this part!!!
Below is a graphic of the primary "box" pattern for the blues. You can do a million riffs within this simple pattern. You basically start from the root note on the sixth string and the pattern from low to high in frets is 4-3-3-3-4-4
This example is in the key of F#. You will notice that this is actually a natural minor scale which you can play over a major or minor chord.
Sunday, February 20, 2011
Guitar Players
Here is a brief introductory list of some of the top guitar players in the world that should be studied.
Joe Satriani - Probably the best overall guitarist in the category of instrumental rock. Incredible tone and intonation. Always has a great rock rhythm, singing melodies and soaring solos. He goes above and beyond to add technicolor to his sound through high "squeals" and heavy use of wah. CLICK FOR VIDEO.
Andy Timmons - Probably one of the best overall players having fused more styles than any other guitarist. Very comfortable playing rock, jazz, country, blues, you name it. CLICK FOR VIDEO.
Eddie Van Halen - Pioneer in fretboard tapping. Probably the best guitarist in a rock band setting. Unmistakable tone. He changed the face of guitar with some of the flat-out fastest riffs in rock in the "Eruption" Solo. CLICK FOR VIDEO.
Andy Summers - Definitely the king in the Ska category. Andy is best know for his days with the Police, where he played contrapuntal to Stewart Copeland's neo-reggae drumming and Sting on bass. Key to his style is the use of energetic rhythms and fantastic color chords. CLICK FOR VIDEO.
More names...
Steve Vai
Eric Johnson
Jason Macedo
Shawn Lane
Jeff Beck
Steve Howe
Brian May
Steve Morse
Alex Lifeson
Randy Rhodes
Marty Friedman
Steve Luthaker
The Edge
Vinnie Moore
Tony MacAlpine
Joe Satriani - Probably the best overall guitarist in the category of instrumental rock. Incredible tone and intonation. Always has a great rock rhythm, singing melodies and soaring solos. He goes above and beyond to add technicolor to his sound through high "squeals" and heavy use of wah. CLICK FOR VIDEO.
Andy Timmons - Probably one of the best overall players having fused more styles than any other guitarist. Very comfortable playing rock, jazz, country, blues, you name it. CLICK FOR VIDEO.
Eddie Van Halen - Pioneer in fretboard tapping. Probably the best guitarist in a rock band setting. Unmistakable tone. He changed the face of guitar with some of the flat-out fastest riffs in rock in the "Eruption" Solo. CLICK FOR VIDEO.
Neal Schon - Probably the most melodic of all rock guitarists. His melodies are heart felt and emotional. His leads, presented in Journey songs, are known for their singable lines that go on until they crescendo into a blistering climax. CLICK FOR VIDEO.
More names...
Steve Vai
Eric Johnson
Jason Macedo
Shawn Lane
Jeff Beck
Steve Howe
Brian May
Steve Morse
Alex Lifeson
Randy Rhodes
Marty Friedman
Steve Luthaker
The Edge
Vinnie Moore
Tony MacAlpine
Wednesday, February 16, 2011
Jazz Guitar Chords
The world of Jazz music is dominated by chord extensions. Those are chord tones higher than the fifth scale degree. Any jazz chord chart you read is going to be at least a 7th chord if not a 9th, 11th or even 13th. Very rarely would you play a plain major or minor chord in a jazz setting, although it does happen.
To start visualizing jazz guitar chords, start with your basic "Oklahoma" D Major open chord. From low to high, you have the notes D, A, D, F#. Notice that you are duplicating the note D with the open D string and the D on the B string. In jazz, you are going to richen up your chords with a little more color.
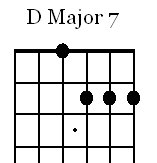
Next, drop that D on the B string down to C#. This creates a Dmaj7 chord. Now you have a much richer sounding chord with no repeated notes.
To start visualizing jazz guitar chords, start with your basic "Oklahoma" D Major open chord. From low to high, you have the notes D, A, D, F#. Notice that you are duplicating the note D with the open D string and the D on the B string. In jazz, you are going to richen up your chords with a little more color.
Next, drop that D on the B string down to C#. This creates a Dmaj7 chord. Now you have a much richer sounding chord with no repeated notes.
Thursday, February 10, 2011
Learning Structures of Triads
Sorry, this article has been moved to..
http://www.expressive-guitar-lessons.com/learning-triad-structures.html
.
http://www.expressive-guitar-lessons.com/learning-triad-structures.html
.
Tuesday, February 1, 2011
Picking Exercise - Alternate Doubles in Sequence
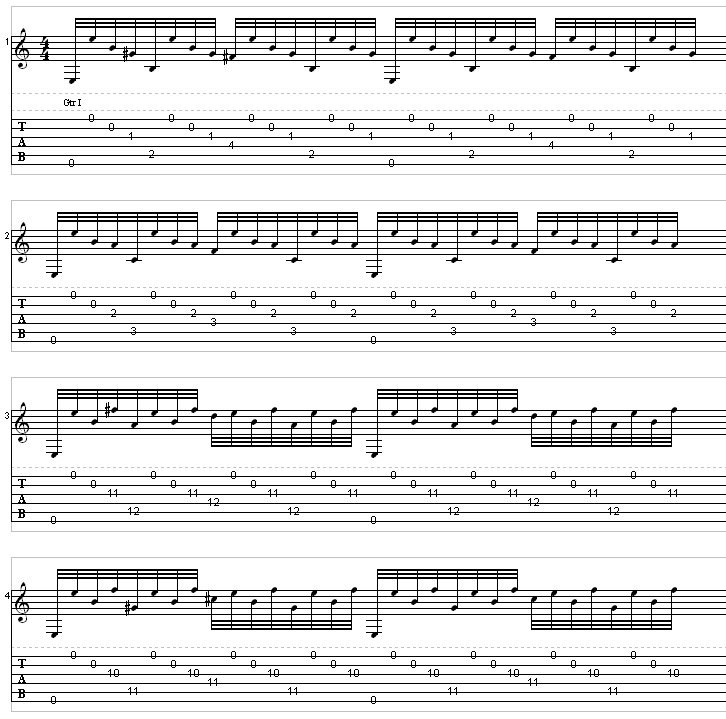
This pattern is a descending sequence of four notes in the key of G major with each note being picked twice.
This is a great workout for building coordination between right and left hands. The key to this exercise is that you are pushing your self both in picking precision in the right hand and scales and patterns in the left hand.
Keep in mind you are always maintaining alternate picking (up and down strokes). Try it starting with up picking on the downbeat and the next time start with the down stroke.
So you can see the simple pattern taking place with the descending four note sequence. And instead of a straight sequence your are simply picking each note twice. Of course, the obvious thing is you want to continue this pattern all the way down the neck and then back up. And of course, you can do this in any key, I used G major in this case.
Now here's the next frontier and this is very important - Instead of picking two times per note as above, try actually picking three times per note that way there are 12 notes per 4 note sequence. You will find you are having to actually pick much faster and your left hand will get slightly slower. Once you get this down go to four picks per note, etc. I actually go all the way to seven picks per note.
Lastly, go back to two picks per note, but this time change the number of notes in the descending sequence. A sequence of two, three, four, and five note patterns and beyond are possible.
Sunday, January 30, 2011
Open Chords on Guitar
The most fundamental chords that all guitarists learn are the "Open Chords". These chords are all played within the first three frets of the guitar and always use at least one open string.
First, learn each major chord from A to G and be able to play them consecutively at faster tempos. Then try the same thing with Minor, Diminished, etc. Below is a chord by chord breakdown.
A Major - Play the E on the D string with the first finger, the A on the G string with the 2nd finger, etc. Let the open A and E strings ring out. When playing any chord on guitar make sure every note is sounding and is not getting cut off by a stray finger.
B7 - The B major chord is not very practical to play as an open chord although it is possible. A lot of times you are playing in the key of E for example so you are using a B7 as a V chord rather than a straight B major chord anyway. For this reason, I am showing you the B7 shape.
Thursday, January 27, 2011
Kevin Bennett - Galactic Winds
Check out my newest guitar track called "Galactic Winds". Hope you like it! I recorded this during the cold chill of winter 2010-2011. This is a great example of guitar layering and there's a few riffs you're gonna love. Read more about the guitar layering.
Monday, January 24, 2011
Classical Guitar Finger picking exercise #1
Hey guys, here's a technique I think you're going to love! This is basically blazing fast finger picking with four fingers of the right hand, and anything you want in the left hand. The picking pattern order is thumb, ring, middle, index. and repeats. In numbered terms 5,3,2,1 with thumb being 5, index 1, etc. So this is really the simplest pattern you can do with four fingers.
Click below for the demonstration video. I'm just improvising freely to demonstrate the technique. Sorry about that "squeak" at the end, it's actually kind of funny.
Below is a sample of the tab. This is enough to get you going just continue the pattern on the chords of you choice. The first three fingers usually stay on the top three strings while the thumb plays bass notes on the 5th and 6th strings. I also find it cool and very challenging to use the thumb on the 4th and even 3rd string which is extra difficult since your index finger is already playing that string.
Free Power Tab Player Required
Just go as slow as you need to with a metronome so you are perfectly on beat and gradually speed up. There's no riff you can't play when you slow down the tempo enough and build up a good technique.
Just go as slow as you need to with a metronome so you are perfectly on beat and gradually speed up. There's no riff you can't play when you slow down the tempo enough and build up a good technique.
Wednesday, January 19, 2011
Learning Chords on Guitar
Just wanted to thank all the viewers around the world who have been logging on Music Learning Station. Now let's talk about chords. The great thing is there are several ways to approach chords on the guitar.
"Open Chords" are the major shapes used on guitar. They are called "Open" because they all utilize the open strings and do not require barring.
"Bar Chords" extend the open chords up the neck with the bar acting as a movable capo.
"Power Chords" use a combination of barred and fingered chords up the neck usually in a strong root-fifth-root-third shape.
"Extended Open Chords" keep the same shape as open chords but travel up the neck for very exotic sounds.
"Triads" playing only three notes at a time rather than strumming all strings.
"Jazz Guitar Chords" feature chord extensions such as 7th, 9th, 11th, 13th scale degrees. Emphasis is placed on the critical "character" notes that define the chords.
Saturday, January 15, 2011
Learning Guitar Fretboard Tapping
Tapping ads a whole new dimension to your guitar playing and in a way resembles piano/keyboard style since you are striking down on the notes with both hands rather than just one hand and picking with the other.
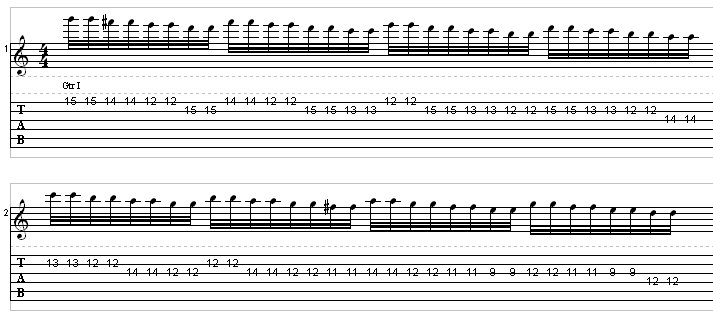
The traditional way is to use the index finger of the right hand (reverse for lefties) to tap down on the high notes and typically have two notes in the left hand that your hammer on and pull off. Your first finger on the left hand is holding down the C on the G string as in the example below.
The first example is the traditional triplet (or sextuplet) tapping pattern in the style of Eddie Van Halen. Notice how easy it is to form a chord between the three notes and then change chords. The chords below go from a C major to C#5 to C6 to Cdom7 by changing one note at a time in the right hand.
Tuesday, January 4, 2011
Layering guitars in recording studio tracks.
Hello guitarists, just wanted to remind you about some very simple techniques that are sometimes easy to overlook in your recordings. The concept of layering for effect will open up a whole new window to expand your playing.
Now the thought here is not to layer 50 million different guitars until you hear nothing but static on the tape. Just one additional guitar is enough to completely transform your sound. During the recording of my latest guitar piece, "Galactic Winds" I did the simplest thing and it sounded great. The melody line I had come up with just not sounding thick enough, so I played the same exact part an octave higher and that created the "outer space" sound I was looking for.
What I realized is this gives you a way to play more melodically and you have to cooperate with the "harmony guitar". So you'll definitely have to construct your parts a little more carefully knowing you will have to play the exact part again an octave higher or even a third higher.
This is one of my favorites, harmonizing by thirds and sixths. Let's say the lead guitar one is playing the notes C D E in quarter notes, you can harmonize that with lead guitar two in simple thirds with the notes E F G or sixths with the notes A B C. In this example, you are simply playing parallel thirds or sixths which works as long as the key stays the same.You should try this just for an experiment by recording lead guitar one and lead guitar two in patterns and rhythms of your choosing and try harmonizing in different intervals.
Here's the kicker, you can technically harmonize with ANY interval: unison, seconds, thirds, fourths, etc.
Sunday, January 2, 2011
Minor Ninth Chord Guitar Fingerings
"Minor Ninth" chords present an interesting challenge on guitar because the ninth is so close to the root and third. You have to make some choices about where you place the 9th or the 3rd and whether to omit another a particular chord tone.
First, lets look at the structure of the chord. Am9 chord is spelled A C E G B.
This first example is my all time favorite voicing because the clash of the 9th (B on the G string) and 3rd (C on the B string). This is the "A" form that can be taken up the neck. The example shows 2 chords at once: Am9 and Em9. This does require a little stretch but is essential if you want the dark sounding tension between the 3rd and 9th. This voicing is omitting the 7th scale degree (G) but there are several ways to add that G in or substitute another note.
 For example, just at the G on the E string in the Am9 chord. Since the bass player is playing the root already.
.
First, lets look at the structure of the chord. Am9 chord is spelled A C E G B.
This first example is my all time favorite voicing because the clash of the 9th (B on the G string) and 3rd (C on the B string). This is the "A" form that can be taken up the neck. The example shows 2 chords at once: Am9 and Em9. This does require a little stretch but is essential if you want the dark sounding tension between the 3rd and 9th. This voicing is omitting the 7th scale degree (G) but there are several ways to add that G in or substitute another note.
.
Saturday, January 1, 2011
Tapping Exercise #1 Edge of Pick

Here is an exact riff (shortened) from my latest track called "Heartbeat of the City". I tap the high notes with the edge of the pick for better control. Start by picking the high B note on the B string then pick the D on the E string on the 10th fret. Hammer on the E and F# on the E string.
Now here is the key to this riff. Keep your your 4th finger (pinky) down on the F# on the E string and simultaneously tap with the edge of the pick on the high G on the E string. You do the Tap and release twice. When you bounce back up with the edge of the pick it sounds the F# on the E string because your 4th finger is still holding down the note. This allows you to do a lightning fast bounce between the two notes.
Learning the notes on the guitar.
Hello and Happy New Year to all you guitar advocates! One of the tricky things about guitar is the notes are harder to visualize than say a piano keyboard. Whether you are beginner or advanced, you will need to memorize the notes cold up and down the entire fretboard.
The best way is to start from any open sting and learn each fret one at a time all the way up the neck. The good news is you really only have to memorize up to the 12th fret and the notes repeat from there. For example starting from the open high E string, go up one fret at a time - E F F# G G# A Bb B C C# D D# E, and so on. Repeat this on each string. Over time you will simply memorize that the 3rd fret on the E string is G and the 5th fret is A, etc.
Here is an example where I wrote out the first few notes on the neck, not including sharps and flats.

Here is an example of a "blank fretboard" so you can print it out and chart all the notes for yourself.

Next you can try different ways to challenge your knowledge of the fretboard.
1) Pick any note like F#, for example, and as quickly as you can, play an F# on every string.
2) Pick a fret, for example the 10th fret, and know each note across every string.
.
The best way is to start from any open sting and learn each fret one at a time all the way up the neck. The good news is you really only have to memorize up to the 12th fret and the notes repeat from there. For example starting from the open high E string, go up one fret at a time - E F F# G G# A Bb B C C# D D# E, and so on. Repeat this on each string. Over time you will simply memorize that the 3rd fret on the E string is G and the 5th fret is A, etc.
Here is an example where I wrote out the first few notes on the neck, not including sharps and flats.
Here is an example of a "blank fretboard" so you can print it out and chart all the notes for yourself.
1) Pick any note like F#, for example, and as quickly as you can, play an F# on every string.
2) Pick a fret, for example the 10th fret, and know each note across every string.
.
Subscribe to:
Posts (Atom)