Awesome Guitar

Sunday, January 30, 2011

Open Chords on Guitar

The most fundamental chords that all guitarists learn are the "Open Chords". These chords are all played within the first three frets of the guitar and always use at least one open string.

First, learn each major chord from A to G and be able to play them consecutively at faster tempos. Then try the same thing with Minor, Diminished, etc. Below is a chord by chord breakdown.

A Major - Play the E on the D string with the first finger, the A on the G string with the 2nd finger, etc. Let the open A and E strings ring out. When playing any chord on guitar make sure every note is sounding and is not getting cut off by a stray finger.


B7 - The B major chord is not very practical to play as an open chord although it is possible. A lot of times you are playing in the key of E for example so you are using a B7 as a V chord rather than a straight B major chord anyway. For this reason, I am showing you the B7 shape.


Thursday, January 27, 2011

Kevin Bennett - Galactic Winds

Check out my newest guitar track called "Galactic Winds". Hope you like it! I recorded this during the cold chill of winter 2010-2011. This is a great example of guitar layering and there's a few riffs you're gonna love. Read more about the guitar layering.


Monday, January 24, 2011

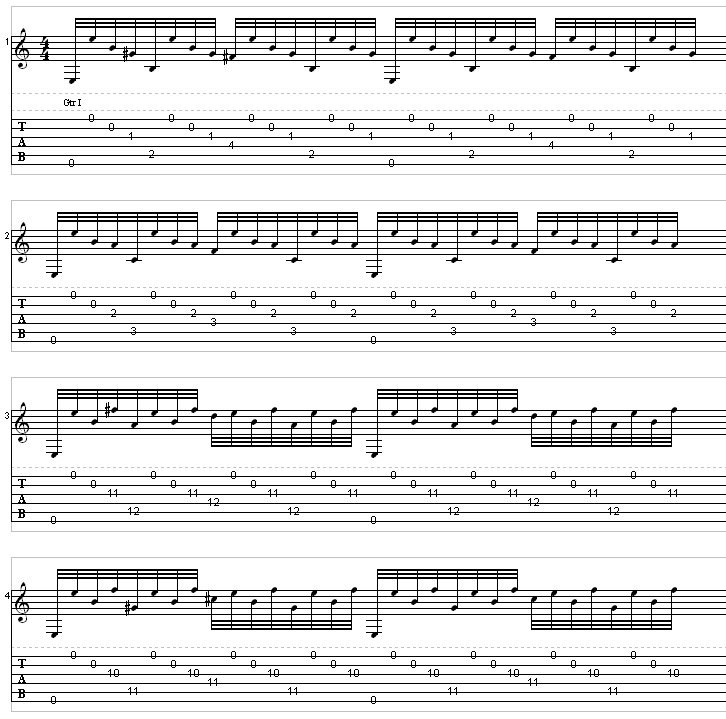
Classical Guitar Finger picking exercise #1

Hey guys, here's a technique I think you're going to love! This is basically blazing fast finger picking with four fingers of the right hand, and anything you want in the left hand. The picking pattern order is thumb, ring, middle, index. and repeats. In numbered terms 5,3,2,1 with thumb being 5, index 1, etc. So this is really the simplest pattern you can do with four fingers.


Click below for the demonstration video. I'm just improvising freely to demonstrate the technique. Sorry about that "squeak" at the end, it's actually kind of funny.


Below is a sample of the tab. This is enough to get you going just continue the pattern on the chords of you choice. The first three fingers usually stay on the top three strings while the thumb plays bass notes on the 5th and 6th strings. I also find it cool and very challenging to use the thumb on the 4th and even 3rd string which is extra difficult since your index finger is already playing that string.


Free Power Tab Player Required


Just go as slow as you need to with a metronome so you are perfectly on beat and gradually speed up. There's no riff you can't play when you slow down the tempo enough and build up a good technique.

Wednesday, January 19, 2011

Learning Chords on Guitar

Just wanted to thank all the viewers around the world who have been logging on Music Learning Station. Now let's talk about chords. The great thing is there are several ways to approach chords on the guitar.

"Open Chords" are the major shapes used on guitar. They are called "Open" because they all utilize the open strings and do not require barring.

"Bar Chords" extend the open chords up the neck with the bar acting as a movable capo.

"Power Chords" use a combination of barred and fingered chords up the neck usually in a strong root-fifth-root-third shape.

"Extended Open Chords" keep the same shape as open chords but travel up the neck for very exotic sounds.

"Triads" playing only three notes at a time rather than strumming all strings.

"Jazz Guitar Chords" feature chord extensions such as 7th, 9th, 11th, 13th scale degrees. Emphasis is placed on the critical "character" notes that define the chords.

Saturday, January 15, 2011

Learning Guitar Fretboard Tapping

Tapping ads a whole new dimension to your guitar playing and in a way resembles piano/keyboard style since you are striking down on the notes with both hands rather than just one hand and picking with the other.


The traditional way is to use the index finger of the right hand (reverse for lefties) to tap down on the high notes and typically have two notes in the left hand that your hammer on and pull off. Your first finger on the left hand is holding down the C on the G string as in the example below.

The first example is the traditional triplet (or sextuplet) tapping pattern in the style of Eddie Van Halen. Notice how easy it is to form a chord between the three notes and then change chords. The chords below go from a C major to C#5 to C6 to Cdom7 by changing one note at a time in the right hand.

Tuesday, January 4, 2011

Layering guitars in recording studio tracks.

Hello guitarists, just wanted to remind you about some very simple techniques that are sometimes easy to overlook in your recordings. The concept of layering for effect will open up a whole new window to expand your playing.

Now the thought here is not to layer 50 million different guitars until you hear nothing but static on the tape. Just one additional guitar is enough to completely transform your sound. During the recording of my latest guitar piece, "Galactic Winds" I did the simplest thing and it sounded great. The melody line I had come up with just not sounding thick enough, so I played the same exact part an octave higher and that created the "outer space" sound I was looking for.

What I realized is this gives you a way to play more melodically and you have to cooperate with the "harmony guitar". So you'll definitely have to construct your parts a little more carefully knowing you will have to play the exact part again an octave higher or even a third higher.

This is one of my favorites, harmonizing by thirds and sixths. Let's say the lead guitar one is playing the notes C D E in quarter notes, you can harmonize that with lead guitar two in simple thirds with the notes E F G or sixths with the notes A B C. In this example, you are simply playing parallel thirds or sixths which works as long as the key stays the same.You should try this just for an experiment by recording lead guitar one and lead guitar two in patterns and rhythms of your choosing and try harmonizing in different intervals.

Here's the kicker, you can technically harmonize with ANY interval: unison, seconds, thirds, fourths, etc.

Sunday, January 2, 2011

Minor Ninth Chord Guitar Fingerings

"Minor Ninth" chords present an interesting challenge on guitar because the ninth is so close to the root and third. You have to make some choices about where you place the 9th or the 3rd and whether to omit another a particular chord tone.

First, lets look at the structure of the chord. Am9 chord is spelled A C E G B.

This first example is my all time favorite voicing because the clash of the 9th (B on the G string) and 3rd (C on the B string). This is the "A" form that can be taken up the neck. The example shows 2 chords at once: Am9 and  Em9. This does require a little stretch but is essential if you want the dark sounding tension between the 3rd and 9th. This voicing is omitting the 7th scale degree (G) but there are several ways to add that G in or substitute another note.

For example, just at the G on the E string in the Am9 chord. Since the bass player is playing the root already.

.

Saturday, January 1, 2011

Tapping Exercise #1 Edge of Pick


Here is an exact riff (shortened) from my latest track called "Heartbeat of the City". I tap the high notes with the edge of the pick for better control. Start by picking the high B note on the B string then pick the D on the E string on the 10th fret. Hammer on the E and F# on the E string.

Now here is the key to this riff. Keep your your 4th finger (pinky) down on the F# on the E string and simultaneously tap with the edge of the pick on the high G on the E string. You do the Tap and release twice. When you bounce back up with the edge of the pick it sounds the F# on the E string because your 4th finger is still holding down the note. This allows you to do a lightning fast bounce between the two notes.


Learning the notes on the guitar.

Hello and Happy New Year to all you guitar advocates! One of the tricky things about guitar is the notes are harder to visualize than say a piano keyboard. Whether you are beginner or advanced, you will need to memorize the notes cold up and down the entire fretboard.


 The best way is to start from any open sting and learn each fret one at a time all the way up the neck. The good news is you really only have to memorize up to the 12th fret and the notes repeat from there. For example starting from the open high E string, go up one fret at a time - E F F# G G# A Bb B C C# D D# E, and so on. Repeat this on each string. Over time you will simply memorize that the 3rd fret on the E string is G and the 5th fret is A, etc.


Here is an example where I wrote out the first few notes on the neck, not including sharps and flats.


Here is an example of a "blank fretboard" so you can print it out and chart all the notes for yourself.


Next you can try different ways to challenge your knowledge of the fretboard.

1) Pick any note like F#, for example, and as quickly as you can, play an F# on every string.
2) Pick a fret, for example the 10th fret, and know each note across every string.

.